Tuesday, July 24, 2018

HOW TO CREATE AN ISOMETRIC DRAWING IN AUTOCAD


If we talk about the isometric drawing in AutoCAD then these drawing aren’t 3d drawing. We can’t compare them with 3d. If you want to learn advanced AutoCAD then comprehending the concepts of isometric drawing is really significant.

In this article, I will explain the methods of creating an isometric drawing in AutoCAD. So, let’s start from the exact meaning of Isometric drawings.

ISOMETRIC DRAWING – Un Insight

  • If we talk Isometric Drawing then it is basically related or we can say similar to PERSPECTIVE DRAWING, which is widely used by architecture designers to present 3D forms on a 2D drawing plane.
  • Isometric drawing has the same functions like the perspective drawings, they have a little difference in their applications: -
  • Perspective drawing tracks the small size of objects as they recede from view. Drawings like Isometric have the same sizes and this is the reason why these drawings track all objects of equal dimensions. 
  • If we talk about Perspective drawings, they show alterations in the object’s shape and angle to the form they recommend. Through this way, the architect designer exhibits depth in the drawing. Whereas this is not similar to isometric drawings as these drawings have static shapes and angles. 

Now I’ll explain how to draw an isometric drawing step-by-step in AutoCAD by making a sample drawing as given below.

  • For making an isometric drawing, first of all, enter a command “SNAPSTYL”.
  • And then enter an initial value for ”SNAPSTYL” as…‘1’.

  • An isometric selection cursor will appear on the screen.

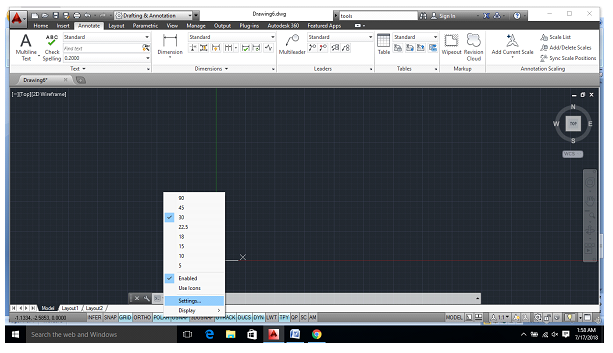
  • Then make sure that polar in “ON” 
  • Then go to polar settings
  • In the opened dialogue box select “POLAR TRACKING”.
  • Set the increment angle as per your requirement.
(here taken as 30)

  • Select line command(L+enter) and draw a line of required length.

(here taken as 120mm)


  • Now you’ll see that the line can’t be drawn further in right direction, so we need to change the plane for it.
  • The plane can be changed by using function key “F5”. And the line can be drawn easily.
  • Now draw as shown in the figure above, by changing the plane of the cursor accordingly.
  • Now select the ellipse tool above or type command “EL+enter”.


  • Now, select isocircle in the command box.


  • Select the mid-point of the line as shown in the figure.
  • And start drawing an isocircle.


  • Change the plane using the function key “F5”, if required.

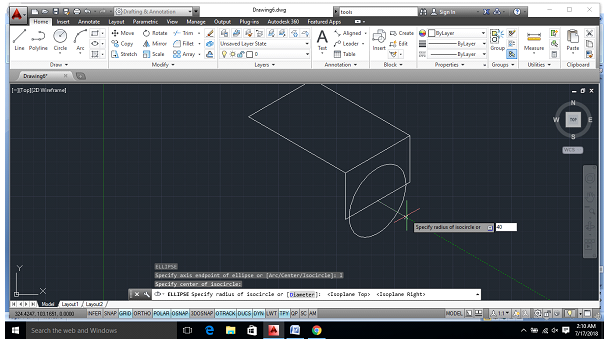
  • Create an isocircle of required radius.
(here taken as 40)

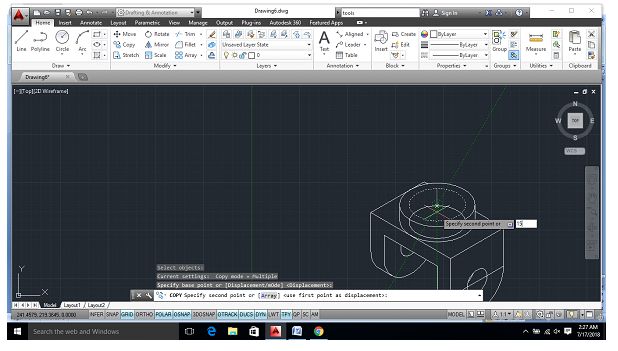
  • Copy the lines as shown in the figure taking required distance
(here taken as 20mm)

  • Trim the unrequired lines using the trim command.
  • Type “TR+enter” in the command box for using the trim tool.

  • Use quadrant tool in line command to join the rounded curves.


  • Trim the unrequired lines which are not required in the drawing.


  • Find the center-point of the rectangle as shown in the figure.
  • For center point- right click on the midpoint of one side and drag to the mid-point of any other side of rectangle and then drag to center.


  • Again, draw an isocircle of required radius.
(here taken as 40)


  • Copy the isocircle at a distance of 15mm above it.


  • Again, connect the curves using quadrant tool in line command.


  • Now taking the center point draw another isocircle of the required radius.
(here taken as 30)


  • Copy the isocircle of radius 30mm, 15mm below it in the same plane
  • Taking it as a centre again draw an isocircle of required radius
(here taken as 15mm)


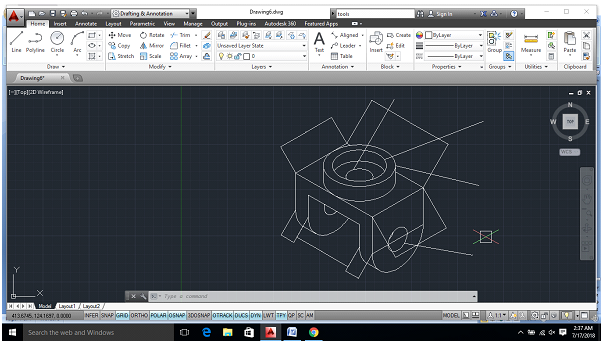
  • Trim the unrequired lines and finally, we are completed with our isometric drawing.

NOW FOR DIMENSIONS


  • Select “ALIGNED” option for marking dimensions of an isometric drawing.


  • Select start and endpoint of the required line and extend it as per requirement as shown below.


  • Similarly, mark all other required points as shown above. 


  • Now, for marking the dimensions of isocircle, select leader from the toolbar.


  • Select the isocircle and extend the line as per the requirement.
  • And then enter the radius of the isocircle.


  • Similarly, do for all other required isocircles for marking their radius.
  • As we can see the dimensions are not visible as their size is too small.
  • So, we have to adjust their size as required.


  • Select “ANNOTATE” in the toolbar.
  • Select the standard setting option as shown above in the figure.


  • Select “MODIFY”, in the dialogue box.


  • Go to “FIT”, and enter the required size of the text.
(here it was set to 18)


  • Now, we can see that the dimensions are clearly visible.

  • Similarly, for radius markings.
  • Select “MULTILEADER” settings and select “MODIFY” option.
  • Go to “LEADER STRUCTURE” and enter the required text size.
(here it was set to 18)


  • Now, as we can see all the dimensions are now clearly visible.


  • To align the dimensions marking, select “ANNOTATE”
  • Then go to “DIMENSIONS” and select “OBLIQUE”. 
  • Select the required dimensions which are to be done.


  • Enter the angle of inclination as per the requirement.
(here it was 30, 120 and 150 respectively) 


  • .You have successfully added dimensions to your isometric drawing.
So, this is how we design an isometric drawing in AutoCAD. Hope my efforts will help you to comprehend AutoCAD better. But I would highly recommend you to go for a training institute as for becoming an AutoCAD Master you need professional training and right guidance. One such professional and renowned training institute is ADMEC Multimedia Institute where you will get industry standard and relevant training on latest applications such as AutoCAD, 3DS Max, Revit, Google SketchUp etc.

Author Section: Hi, I’m Priyam Narang, a student of ADMEC and has successfully completed my AutoCAD Master course  I hope this blog would be beneficial to you. 

To read more such blogs on architecture interior designing, you can go through All CAD Blogs 

Thursday, July 5, 2018

10 Not to Avoid Points while Learning Java


If we talk about object orientation, it includes Java one of the best object-oriented languages which is used for mobile and web applications and which is developed by Sun Microsystems. It is a platform independent language because it can be run on different platforms like Mac, Windows, Linux etc. Here are some important points which one shouldn’t avoid while learning Java course in Delhi

Important Points of Java 

1. Java is not a Multiple Inheritance Language

It does not support multiple inheritance which means one class cannot inherit multiple classes but it supports hierarchical inheritance which means one class can have two extended child classes.

2. Overriding in Java

It means that Java is providing the ability to child class by different implementations of the superclass. When subclass has the same parameters, same name and same return type of its superclass then it called as overriding. Overriding can be known as Run Time Polymorphism. 

Know Some Rules for Method Overriding? 

1) Access modifiers must be used in priority fashion which means if a class is protected then it cannot be private it only can be public in override.
2) The final methods in Method Overriding cannot be done it shows an error.
3) The static method can only be used to hide if and only if the supper class and subclass both methods are static.
4) Overriding of private methods cannot be done because of restrictions during the compilation time. 

3. Method Overloading

Which means having the same name as the method but different parameters, this can be achieved by changing the number of arguments and changing the data type of the arguments.
It helps with the enhancement of the readability of the program.
Java main method can also overload the.

4. Abstraction 

Abstraction in Java it uses to hide the delicate functionalities of the program and only show the important things to the user.
For example, when we send the SMS we only know the text in SMS and we don't know the functionality of sending SMS.
Abstract Classes cannot be instantiated, it only can be extended or method implemented.

5. Java Packages

These are of two types one is user define and build in packages.
Swing, net, io, util, SQL,  util, lang, awt,  javax etc. are some Java Build-in packages. It is helpful because it avoids naming collisions, provides protections. Java Packages and interfaces are used to categorized classes in Java.

Know the Running Process of Java packages? 

To compile use –  javac -d. filename.java
To Run the Java program using- Java package_name.filename
Here, javac command use for compiling the Java file, -d it tells to Java compiler where to place the class files.
There are three ways to import the Java packages from outside of the classes-
1) import package.*
2) import package_name.classname
3) fully qualified name
The standard way to define the Package Name must be- domain.company.package

6. Bindings in Java

In Java, method body and calls can be interconnected and that is known as Bindings of Java.
There are two types of Binding like-
1) Static
2) Dynamic
Static Binding- In Java, Static binding is also known as Early Binding. If any methods have static, private, final.
When the type of Object is determined by the compiler then it is known as binding in static.
Dynamic Bindings- When the type of an object determines at runtime.

7. The instance of operator

It is a type of operator which use to compare that a specific object is of which type and after comparing that it returns true or false.

8. Java Swing 

These are light-weighted and platform-independent components. Swing is a part of Java Foundation Classes (JFC) which is used to create window-based applications.

9. Java Applet 

Useful at the client side because it uses to create dynamic content on web pages.It has various advantages like consuming less response time as it is a server-side language.There are two ways to run an applet i.e. by the use of HTML file and second is AppletViewer which also use for testing purpose. It uses in Gaming and animations mostly.

10. JDBC

Java is used to connect and execute a query on databases which is a Java API. It uses JDBC drivers to build connections with databases.

History of JDBC

Before the JDBC, ODBC API used with the database which uses ODBC drivers. ODBC has written in C language which is not secure and platform dependent so, for JDBC has developed its own API which uses its own drivers which are written in Java language. JDBC is used to handle the database activities and perform various activities like Connect, Execute and Retrieve.
Java is a language which is based on Object orientations, which is platform independent and widely used. Java uses inheritance, Overriding, Overloading, Abstraction, Packages, Binding in Java and some more important like Instance of the operator, Java Swing and JDBC. 
So, you need to grasp all the essential perceptions and fundamentals of Java very profoundly and for accomplishing such type of in-depth learning joining finest Java Training Institute in Delhi is decidedly recommended.

If you are looking for an ideal training institute for Java training then ADMEC Multimedia Institute would be perfect place for you. Joining ADMEC will not only boost your self-assurance level and develop your profile as Java pro in no time.
 

Featured Post

ADMEC Multimedia Institute Scholarship Program

The ADMEC Multimedia Institute scholarship program aims to select and trained talented non working female, married woman and non married m...