Saturday, September 29, 2018

Latest Best Ever Features of After Effects


Adobe After Effects updates has always been better than before! Now too, it hasn’t disappointed us. Apparently, the new features are like a gift to motion editors as well as graphic artists. It has 3d camera tracker, adobe anywhere integration, its faster with better UI, has quick import option and what not! Working with new features makes your After Effects Course training better. Here are a few best features of it:


List of Latest Best Ever Features of After Effects

  • 3D Camera Tracker:
One of the most amazing features of After Effects is no doubt the ‘Camera’. Producing a smooth camera movement while adjusting the speed has been made possible in it. Placing images in proper sequence and then moving the camera accordingly gives beautiful results.
One can easily adjust the movement of the camera. 
  • Faster
Giving the best of results with least possible efforts! Yes, it has been made possible with the latest After Effects update which provides with a greater speed to the users thus ensuring convenience and increasing user satisfaction at the same time. It thus saves a lot of time and effort.
  • Composting
Indeed, composting has been made so much easier with the help of this amazing application. Doing this with the help of a video editing software would be incredibly difficult. Features like ‘keying’ makes it even more convenient for removing the green screen for now it’s just a single click away. 

All the other adjustments are also provided with the keying feature thus giving it a more realistic look. This is the reason why most of the video editors now prefer to use After Effects for their less flashy projects.
  • Type Animation Presets
How convenient it is to get readymade text animation presets! 
There are many such presets provided to us by after effects, making our work so much easier and also providing us with the best of results. There is ‘typewriter’, ‘wavy characters’, ‘fade’ and a lot more.
  • Motion Graphic Template
With recent update, Adobe After Effects has come up with some options that allow you to work with motion graphic templates, this means now you can open such templates in your application as your project. We can edit it as per our requirements and then save it as a new project or whatever we feel like.
  • 3D in After Effects
It is not just after effects, rather it’s a bundle of various software like Illustrator, Photoshop, and Cinema 4d too! You can simply use any object created in cinema 4D as footage in After Effects and bring out amazing results out of it. It thus saves a lot of time and efforts. It doesn’t even require rendering first!
  • Quick Imports
How creative the results would be if you are able to convert your graphics into motion graphics. 
After Effects allow you to integrate with other software of Adobe like Illustrator and Photoshop with the help of import.

You can import any Photoshop or Illustrator file while retaining the original layers with it. Not only it makes your work so much easier, but it also opens up new creative possibilities. 
  • Blending Options
A Photoshop Master would have already mastered the blending options and how amazing it would be for him to get the same options in After Effects too!

Just like Photoshop, it also provides us with the same blending options, thus enhancing our work and making it even more approachable. 
  • Master Properties
The properties of After Effects have been streamlined. It now provides us with master properties like text, color, position, etc which makes our job a lot easier without having to open a precomposition so as to make the changes.
  • Motion Blur
One of the latest features of After Effects is the ‘motion blur’ which gives us a splendid opportunity to enhance our videos, footage or render scenes, making it a bit more realistic and easier to watch.
  • Adobe Integration
Now you can easily work with other editors or graphic artists no matter where they are, that too in real time! Its known as Adobe Anywhere Integration, the latest feature of After Effects which lets you connect with your colleagues or any person you wish to work no matter whether they are in front of you or not.

Conclusion of the Blog
Every update of After Effects improves it and takes its one step higher, making it better than before. It thus provides us with a better user experience as well as easing out our work.

Author Introduction: This informative blog is written by Nida Khaldy who is pursuing Graphic Master Plus course for ADMEC Multimedia Institute. 

Want to read more such blogs!! If yes then go through our Video Editing Blogs category page and enhance your understanding on the latest trending topics of this industry. 

Thursday, September 27, 2018

Best Practices for Web Designers


Web designing is one of the significant aspects in this existing era of digitalization. One can achieve a remarkable position by having a well-structured and striking website. A website is now becoming one of the finest ways to attract with your customers all over the flora and fauna and this is the reason why most of aspirants are joining web designing and development courses from professional training institutes like WDI. So, today we are going to discuss on the best practices for web designing that every designer should know to get desiring outputs.


Best Not to Avoid Practices for Web Designers 

Here is the list of top 10 practices that every web designer should know and follow.

  • Design Should Be Simple, Fresh and Unique
This is very first and effective mantra that website should be simple, fresh and unique Because the attraction of a website relies on its simplicity. One doesn’t need to add extraordinary stuffs to make website attractive, it will look attractive as simple as it will be. A website also must be unique because a brand is established as a unique brand in industry, same as website also must be unique because there are lots of websites having same theme and same pattern. If you make it unique, a visitor will remember your site for sure.

  • Showcase Your Services and Products
Obviously, you will be selling any services and products through your site. So, make sure you showcase them clearly, if you do not clearly tell your visitor about your products in spite of showing other stuffs so you are going to lose your customer. “First Impression is the last Impression” you have first impression to attract your customer so it should be in directly way to engage your customer with your services.


  • Use High Quality Videos and Images
Make sure it is the very important term to mind it, you are in 2018. And there are millions of dynamic and static sites there. If your website is static you can make it awesome by just using high quality images and videos that will really catch a user attention.

  • User Experience
User Experience(UX) is the backbone of your website. A good User Interface(UI) is not enough, you have to enhance user experience and make your site functional and interactive. Because every element on webpage says something if you work with user experience, it’s like a story on a webpage that you want to show your visitor when they visit your website and how you take them to step by step and show your services. By learning the best UI development courses in Rohini you can attain a thorough knowledge of UX and UI designing.

  • Use the “Best Typography”
Yes, use the best typography that suits your business that suits your whole website. Because the font you are using matter a lot for your website. So it is necessary to find the best font before moving to other things. Like if you are making educational or e-learning site you will use educational fonts and kids font and if you are making a business website you will surely use official font.

  • Focus on Color Scheme
Color scheme plays a vital role in the entire website, it like a first impression when a visitor visits your site the very first thing he notices the color scheme you have used. Color scheme depends on the type of business there are many kinds of business like real state, education, hotels, tour and travel, religion-related, matrimonial.

  • Easily Accessible Website
Your website must be easily accessible for a user to sustain consistency in your website, Most of the users do not want to involve or see extraordinary things they just want to see your services at once. Keep the navigation and web design consistent throughout the site, so they can easily go to next or next to previous when needed.

  • Try to Make Your Site Light
It’s a very secret hack to sustain consistency and keep engaged your customer with your website. Make your site as lite as possible, notice when sites load, how much time it takes to open. Do not use any heavy image or any video that slow down your site and do not put extra content in your hosting or FTP server.

  • Required Content
Your content should be enough required, you don’t need to put extra content to explain your customer about your products and services, there are also many things to attract them that comes with the user interface and user experience. All you need to put the required content to make your site beautiful and clean.

  •   Follow SEO Practices
At last, one has to focus on SEO practices to make it website successful for business. Search Engine Optimization (SEO) and Search Engine Marketing (SEM) are a very important part of SEO. Take time to learn SEO by joining best SEO Training Institute in Delhi and adopt in your search ranking, because you obviously want to see your website on 1st rank when you search on google with your company name.

Web designing is really a highly paid sector which offers numerous career opportunities for aspirants. You can also enter in the sphere of opportunities by completing diploma courses in Web designing. And you can apply the below-given practices during your training to explore the web in detail

Monday, September 24, 2018

PHOTOSHOP vs GIMP vs Inkscape: Which one is the Designers' Choice?


You can be a professional designer by selecting right way to exhibit your designing skills. One such way is by choosing right designing software. Today, in this blog we are going to compare three very popular designing applications which are Adobe Photoshop, GIMP and Inkscape. Let’s have a look at each individually.

An Insight to Adobe Photoshop

Photoshop is the most fully featured image editing software manufactured by Adobe Systems. One who wants to enter the arena of designing should sign up with professional Photoshop Course from any renowned training institutes for attaining advanced and essential tricks and techniques to get mastery on it. Let’s have a look at its features and some important tools.

Features of Adobe Photoshop are as follows:

  • It allows to perform highly advanced image manipulation.
  • You can use this application to crop, resize and correct color on digital photos.
  • It has image adjustments, lens correction, retouching, image stitching, HDR, fixing framing tools.
  • It has filters, styles, effects, fonts as well as tools for painting, sketching and typography work.
  • It has both raster and vector graphics.
  • It includes tools for video editing and supports 3D objects and 3D printing.
  • It has editing system with layers that act as mask or filters, with underlying colors.
  • Photoshop CC (Creative Cloud) allows users to work on content from any computer.
  • It usually takes up 1GB from your PC or Mac to perform. 
  • It needs High amount of RAM and other hardware resources.
  • Photoshop is the photo editing software that is industry-standard.
  • Photoshop has many proprietary tutorials.
  • It's an excellent tool that makes photo editing easy and efficient.
  • Photoshop offers Pantone colors. It doesn’t support GIMP’s native file format i.e. XCF files. 
  • Photoshop is only for Mac and Windows.
Tools and Other Features of Photoshop

  • Healing tools
  • Stroke smoothing
  • Brush organization
  • Various collaboration tools
  • Custom path & width
  • Copy-paste layers
  • Curvature Pen tool
  • CMYK mode
  • Non-destructive editing (original layer remains unaltered).
USAGE OF PHOTOSHOP 
  • Photoshop is a software program developed by Adobe that allows users to edit graphics.
  •  It's used by graphic artists, designers and photographers, among others, and can enhance and manipulate images to improve their overall appearance.

INKSCAPE

Next in the queue is Inkscape which is a popular open-source application commonly used for editing vector graphics. You can not only edit graphics but you can create different graphics for instance logo, abstract, illustrations etc.  It also allows you to import different software files such as Photoshop, SVG, and Illustrator.

 The basic objects in Inkscape are Rectangles & Squares tool, 3D Boxes tool, Stars & Polygons tool, Circles/Ellipses/Arcs tool, Spirals too, Pencil tool (Paths, pen tool, Calligraphy tool (Paths), text tool, spray tool, paint bucket tool, connector tool.

GIMP

GIMP (GNU Image Manipulation Program) GIMP is completely free and open source, meaning you can use GIMP and manipulating graphic images that runs on Linux, other Unix-based operating systems, and also on Windows and Mac OS X. You can use all of its features without spending a penny. 

USAGE OF GIMP

  • GIMP is the most feature-rich free image editing tool. It has most image manipulation and workflow tools that you would expect from an image editing software and what it lacks it makes up with plugins.
  • It allows you to quickly do basic photo manipulation so you can easily get the product you need without having to worry about complicated features getting in the way.
  • GIMP versions are available for Mac, Windows, Linux, and UNIX. 


GIMP’s Tools and Features

  • Customizable interface
  • Can write or change the source code to fit your needs or create new plugins
  • Able to read and edit PSD files
  • Full suite of painting tools
  • Graphic design elements
  • Digital Retouching
  • Hardware support
  • Scribus – an open-source page layout program to help publish your digital and printed materials.
  • You can read and edit photoshop files in GIMP.
  • GIMP is very small and lights not more than 25 MB.
  • GIMP does not require a large amount of RAM or other hardware resources.

 Photoshop Vs GIMP Vs Inkscape

  • As compare to GIMP and Inkscape Photoshop consists of advanced features and produces the professional level of results. 
  • As compare to Photoshop, GIMP and Inkscape produce a lower quality of work and needed more time.
  • GIMP and Inkscape both are open sources whereas Photoshop is paid software. 
  • GIMP and do not need large RAM, Photoshop need High RAM.
So, this is how we have completed our session on a comparison between three major applications.

Author Introduction: This blog is written by Priya Bhatnagar who is pursuing Architect Interior Premium course from ADMEC Multimedia Institute. This blog is the part of her Photoshop assessment which has been issued by Kapil Sir.

Wednesday, September 19, 2018

10 Essential Commands of Revit Architecture


If you are learning Revit Architecture course from any Revit training institute in Rohini, Delhi then you need to know the top 10 essential commands of this building modeling software to comprehend it in a better way. This blog we will be discussing on the 10 essential commands that you must know for creating amazing architectural drawings. So, let’s start with the software introduction. 


What we know about Revit Architecture?

Revit Architecture is software for architectural designs, interior design etc.  This software is created by Autodesk for architects, interior designers, and building professionals. In this software, there are many tools for making architectural designs.  This software is specially designed for architect interior designers to create building modeling structures. Autodesk created many versions of Revit.

Advantages of Revit Architecture: -

  • This software is very easy.
  • Each component which we create in this software has parametric qualities.
  • We can change the component dimensions according to the requirement.
  • It contains its own family.
  • We only need to create a 2D plan after that we get our 3D model automatically.
  • In this software, we can move, rotate and delete any component separately.
  • We get an estimated cost.

10 essential Commands of Revit Architecture

  • UN:- Project Units
The short command of Project Units is UN by using this command we can change the units in project unit panel according to our requirement. If we want to use this command so we have to press U and N at the same time.


  • PP:- Properties
The short command of Properties is PP in Revit Architecture.  In this properties panel, we can change dimensions, view scale etc. If we want to use this command so we have to press double P at the same time.


  • WA:- Wall
The short command of Wall is WA in Revit Architecture.  We use this tool to create any type of wall (Architectural, structural). There is a different type of wall (Architectural, structural, Wall by face). If we want to use this command so we have to press W and A at the same time.


  • MV:- Move
The short command of Move is MV which helps us to move any object from one place to another place.  If we want to use this command so we have to press M and V at the same time.


  • OF:- Offset

The short command of Offset is OF in Revit Architecture.  This is the most useful command in this architectural designing software.  By using this command, you can move or copy a selected element perpendicularly to its length. This is the most important command of this architectural designing software. If we want to use this command so we have to press O and F at the same time.


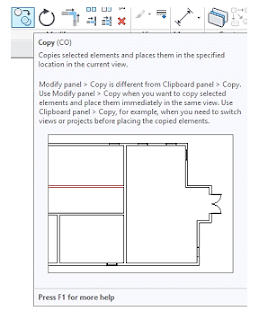
  • CO:- Copy

The short command of copy is CO. This command copies selected elements and places them in the specified place. This is one of the essential commands of Revit Architecture. If we want to use this command so we have to press C and O at the same time.


  • DE:- Delete
The short command of Delete is DE in Revit Architecture. It removes the elements which we select to delete from our project. If we want to use this command so we have to press D and E at the same time.


  • CM:- Place a component
The short command to place a component in our project is CM. It is consisting of huge libraries for architectural designing. In this library, there are many components like furniture, Lighting, plumbing, transport etc. If we want to use this command so we have to press C and M at the same place.


  • DI:- Create an aligned20dimension
The short command to create aligned dimensions is DI in Revit Architecture. It shows the distance and dimensions between parallel references, or between multiple points or wall. If we want to use this command so we have to press D and me at the same time.


LL:- Place a level
The short command to place a level is LL in your drawing.  If we want to place a level so we have to come in elevations.  Levels are 3D elements that are only visible in views. If we want to use this command so we have to press double L.


Author Introduction

I am Vaishali Srivastava pursuing one of the advanced Architect Interior courses from ADMEC MULTIMEDIA INSTITUTE. I would like to thank my teacher Mr. Kapil Sengar who gave me the opportunity to write an article on “10 ESSENTIAL COMMAND OF REVIT ARCHITECTURE”. He gave me his full support in my Revit project, without his guidance and knowledge this project could not be completed correctly. 

To read more such blogs just go through Interior Architecture Blogs category.

Wednesday, September 12, 2018

Top Motion Graphics Applications that Every Post Production Professional Must Know


hen an individual is set to embark on a journey to make a career in motion graphics designing, there will be many programs that he or she will have to choose from.  Here are some of the most important motion graphics software every designer should become acquainted with. One needs to be acquainted with this list of motion graphics software, to make a career in the fast-growing business of motion graphics.


Top Motion Graphics Software You Must Know

Have you look at the below-given applications which are renowned and ideal in the arena of motion graphics and composting and which are mainly preferred by Post Production professionals.

After Effects

If we talk about the After Effects then it is one of the popular motion graphics applications which is mainly used by professionals in the industry. It is possible to bring in 2D designs created in a program like Illustrator and animate them to create a motion graphics piece. In After Effects, we can not only work with 2D designs but 3D designs as well.  After Effects is capable of using Objects and scenes from most of the 3D applications as footage. There are many plugins that are built in and thirty party plugins to use with things like particles, blurs etc. By learning After Effects Courses from any best training center, you can attain in-depth essential comprehension.

CINEMA 4D 

Cinema 4D is an animation, modeling and rendering software developed by Maxon company. An important feature of Cinema 4D is the Cineware feature that is merged into After Effects. A cineware feature of Cinema 4D enables users to import Cinema 4D elements like assets and scenes into AE just by a drag and drop. In this case, the changes made to the Cinema 4D scene affects the scene imported to After effects and the results become observable in After Effects immediately. CINEWARE also makes the CINEMA 4D render engine accessible directly in After Effects. Thus, CINEMA 4D is a software that can help an individual to become a versatile motion designer who meets the needs of any 2D or 3D projects. The Best way to becoming the master of this application is by joining any Cinema 4D course from an ideal institution.

Nuke

Next in the queue is Nuke which is another amazing application used by professional for motion graphics. It is a major motion graphic design software used in post-production for many motion television and motion pictures. This powerful software enables users to use a system of node when compositions are set up. Nuke is also a motion graphic design software primarily used in Studio houses. 

Maya

Maya is a 3D motion design software used in the development of 3D elements for high graphic video games, films and television. For many years, Maya was the dominant motion graphic designer. But of late, its prominence is taken over by Cinema 4D which is leading in the industry. Maya is well known for its ability to render lengthy 3D footage and renders and animation effects and transitions. 

Conclusion: 

These are some of the top motion graphic software available in the industry. We have more such amazing applications waiting in the queue. It seems that there are new such motion graphics software produced every month. 

So, now we have arrived at the end of this blog. We have seen some best and popular motion graphics software that you really need to know to become a Post Production Master. 

Author Section: This blog is written by Roshan K.L who is pursuing Multimedia Master Plus course from ADMEC Multimedia Institute . 

You can leave your comment in below given comment area for any suggestion or query.


Sunday, September 9, 2018

Scope of 3d Animation in Future


In the last few years, the professional field of animation has brought great extent and innumerable improvement in the animated movies, games, cartoons, and videos in the world and I would say especially in India. It has earned its own importance and significance in the cartoon industry, the gaming industry, and the film industry a lot again. As a result of the propagating opportunities, lots of multimedia training institutes offering professional animation courses to young aspirants to explore fruitful prospects in this field.

According to the report mentioned by FICCI-PWC Entertainment and Media projected the Indian animation industry earn approximate USD 0.31 billion in 2007, and the continuous growth of the Indian animation industry reached USD 0.94 billion in 2012.

The scope of animation witnessing the growth in lots of the animation studios those are catering through cartoons, advertising, TV, and cinema etc. Due to the success of different-2 types of cartoons, online advertising, and movies etc.; demands of the animation in future are legal.

Here's some brief discussion of the usage of animation in various professions:

• Medical
• Architecture
• Online education
• Film industry
• Gaming and Entertainment
• Advertising
• News and Communication
• Automobile
• Fashion and Textiles


Medical:

Now a day animation has become an important tool in medical apart education. Practically it is not possible to demonstrate each and every process of the body and it is also not easy to accompany medical students to operations, therefore an animated video would explain everything and would simplify the whole process.

Architecture

It's a very typical task to depicting the right surrounding, in which we with our family or members would be investing in order to live and work, in this situation animation is used for creation of architectural presentation. Animation is widely used in Photo Realistic Rendering, Architectural 3D Design, 3D Walkthrough (flythrough), 3D Illustration comprise Architectural 3D Presentation and Video.

Online Education:

Now a day it is understood fact that everything is getting online and in the age of online education system animation will reconstruct classrooms. Using animation, we can facilitate in explaining many study materials that is only possible through classroom study. So, animation has become an important tool for both learning and teaching.

Film Industry:

Animation has become a popular tool in media and entertainment sectors. The animation is used in lots of film industry for the creation of 2D and 3D animated movies.
Apart from this usage of in various professions, it is also used in cartoons creation, advertising creation, architecture visualization, mechanical designs and forensic etc.

Find the best animation training institute in Delhi for both classroom and online training. ADMEC Multimedia Institute  is a well-known institute for animation which provides training by industry expert faculty. The interested student also completes photo editing and video editing courses here. 

Friday, September 7, 2018

Understanding Layer Mask in Photoshop


In the arena of designing and photo editing, Adobe Photoshop stands out of crowd. It is a versatile designing, layouting, and photo editing software. Whether you are a graphic artist or a video editor learning Adobe Photoshop is the prerequisite. One can create stunning and outstanding compositions by using this amazing application. Today we are going to discuss the layer mask which is one of the significant terms to understand.

Before we start and the directly go to the layer mask, first we need to know in brief that how Photoshop work or we can say what are the things which is required for photoshop working. Photoshop which is an essential application to create designs and edit the images to make the digital world creative.

An Insight to Layer in Photoshop


In the Photoshop application, we always write or make designs on layers with the help of available tools. Layers are used to work on the individual part of an image while not affecting the other parts of the image. This allows us to place/edit the picture on the same page and without affecting the original picture.


What is the Layer Mask?


We always do not want to make adjustment in the entire image so in this case we can use the layer mask. This is a non-destructive technique which provide to edit/ adjust an image without touching the original layer. we generally create a mask layer of the original image and make our changes and adjustments on that. This method is useful when we need to reverse our changes. 
For example, when we use an eraser tool to erase something from the layer and after erasing when we close the image this then we will be not able to recover the portion which we had erased. In the layer mask we can go back at any time and edit/adjust any part of the masked layer. We also can disable the layer mask to see the image in the original stage. 


There are three colour options in the layer mask:


  • White:- when the layer mask is white the original layer will be visible.
  • Black:- when the layer mask  is black the original layer be not visible.
  • Grey:-  when the layer mask is grey the original layer will be transparent.
So, this was a brief introduction to layer mask in Adobe Photoshop. 

You can read more such type of blogs on ADMEC Multimedia Institute

Tuesday, September 4, 2018

USE OF VISUAL STYLES IN AUTOCAD


AutoCAD introduced a feature known as Visual styles in AutoCAD 2007. The main purpose of Visual styles was to give the user control on how objects lock to whole new level. You can control how edges face look, as well as background, shadows, materials, and lights all without rendering the drawing. It gives the user the freedom that other drawing software don’t. By controlling the overall look of the drawing through visual styles it helps to provide an immersive experience to the user. This feature makes the learning of advanced AutoCAD course easier for me.


WHAT ARE VISUAL STYLES IN AUTOCAD?


VISUAL STYLES help the user control the edges lighting and shading. Visual styles are useful when you want to create a rendered looking drawing that can still editable. It also helps you to draw drawing more clearly. When you open any drawing the default visual style is 2d wireframe. AutoCAD 2011 introduced several additional visual styles. The user now can control the style of visual style by changing its properties.

The visual styles manager displays all the styles available in the visual styles tab. The setting for the selected 
the style is displayed in the panel below the thumbnails.


TYPES OF AVAILABLE VISUAL STYLES


2D Wireframe. This visual style displays an object with lines and curves that represent boundaries.

Conceptual. Display object using some shading to make them look smooth. This visual style uses shades of warm and cold colors. The effect not that much really, but it makes the details of the drawing clearer.
  • Hidden. Display object using lines.
  • Realistic. Display object using shades and material almost makes it look realistic.
  • X-ray. Display objects with transparency like x-ray vision.

*There are more but these are the one I use more often.

CREATING VISUAL STYLES

  • Create a layer choose any color you want.
  • Create a model.
  • Click the view tab, then click visual styles manager.


  • Right, click the conceptual swatch copy then again Right-click anywhere in the swatch area again and choose paste.


  • Right-click once again to edit name and description. Name your visual style and enter a description.


  • Go down to the edge settings section. Set the show value until it feels right.
  • Change the silhouette edges setting.
  • In the edge settings section and select the overhanging edges and jitter edges button to turn on these features.
  • Select the model.
  • From the view, tab choose your visual style
  • And it’s done.

BENEFITS OF VISUAL STYLES IN AUTOCAD


Visual styles in AutoCAD helps the user in many ways, firstly it gives more freedom to the user on how he wants to see the creation he created in many styles from 2d wireframe to realistic. When the user wants to see his drawing boundaries he can switch to 2d wireframe and when he wants to see the drawing in a real manner he can switch up to reality. There are ten default styles in AutoCAD that helps the user to create without much hassle.

From AutoCAD 2007 where they were first introduced to now, visual styles have given his assistance to the user so they can create their desire in form of a drawing. 

Thanks to all these features, my experience of learning AutoCAD course from CTI which an education partner of ADMEC Multimedia Institute has been amazing. You can even create your own visual style the process is given upward you can choose your style how you would view the drawing. Its user-friendly interface helps the user to change its setting anytime whenever he wishes to. You can even change the lighting quality which helps in creating realistic shadows and give a nicer appeal to the drawing. Through 2d wireframe, the user can adjust the boundaries. Lastly, my overall experience with visual styles in AutoCAD was great with the help of these features I was able to create some good drawing.
Visit BlogAdda.com to discover Indian blogs

Featured Post

ADMEC Multimedia Institute Scholarship Program

The ADMEC Multimedia Institute scholarship program aims to select and trained talented non working female, married woman and non married m...