
Selection is the most important and very first thing to do in a designing application or any other field like programming. There are 10 types of selection tool available in Adobe Photoshop which are simply and most convenient selection tools.
If you are a beginner and just started learning Photoshop course then you must read this mini tutorial on selections tools of this versatile application.
Types of Selection Tools in Adobe Photoshop
Below we are going to talk about the selection tools in depth.1. Marquee Tool

Marquee tool is an elementary selection tools that we find at top in the toolbar. To use it, we have to click and drag around an area where we want to select. There are four kind of marquee tool these are - rectangular marquee tool, circular marquee tool, single line row marquee tool or single column row marquee tool. We can use chosen marquee tool that allows us to pick the options by holding down the button.
2. Lasso

Lasso tool performs almost similar function like marquee but it allows us to move around the areas that marquee doesn’t provide. You can remove the unwanted portions using this gadget. Since marquee provides us limited options like line, circle and frame, we can’t select the more at once. Hence, we have lasso which solves our issue within a short time.
Using lasso, one can create the selection very easy by dragging the pointer along path.
3. Magnetic lasso tool

In the comparison with other lasso tools, we find Magnetic Lasso tool more convenient for creating the outline of desired area. You can easily select the curves of any object by this tool as it allows us to follow outlines like a magnet. Just click on the first point and move the pointer along the path or outline you wish to follow and finish the selection by going back to the original point.
4. Magic Wand
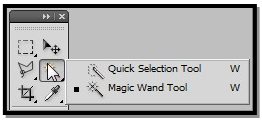
We used this gadget for selecting color-based area which has similar button space like quick selection tool. It can create the selections of curves and sharp edges more quickly than other tools. You can select the particular color area by clicking on that. If you want to create the selection any color- based desiring area then you can use Magic wand.
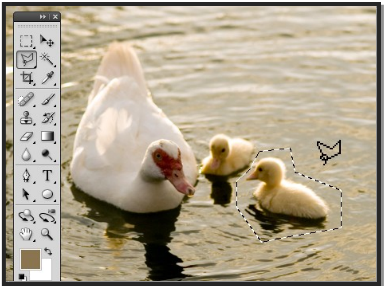
5. Quick Selection

There are very similarities between quick selection and magic wand tool. It just helps to select that are which is based on colour and tone. Just click on that area and Photoshop will automatically determine the area you want selected.
6. Color Range

We have one hidden tool too in Photoshop which we can find from sub menu. This hidden gadget is know as color range that is like a copy of Magic wand. Multiple color selection and limitation is the main feature of this amazing gadget available by using the add and subtract eye dropper options.

7. Inverse

Inverse is used only with a pre-existing selection.It is automatically select the area that isn’t selected initially and deselects the pre-existing selection.If selecting an area is more difficult than selecting the areas around it, we can use inverse by selecting those areas outside and choosing to inverse the selection later. This makes the process faster.
Just have a look at the example below that clearly shows the background has an even tone compared to the subject. (Ctrl + I) is a shortcut of Inverse selection.
8. Grow

Grow is a selection option also used with a pre-existing selection.It extends the selection based on the current selection,usually based on color and tone. The example below shows that it selects the area that expand and cover a wider but within the confines of its tone and color.
But It further expanded when you use to Grow tool one more time.we can repeat the process until the desired area is selected fully.
9. Similar

Similar is also accessible through the Select sub-menu, also works with a pre-existing selection and is much like color range where it extends the selection to the whole image given the specific color and tonal range of the existing selection. Let’s say you’ve selected a patch of clouds in the sky, you can extend the selection to include the other clouds which would probably have the same color and tonal range using Similar.
Take note however that it will also include areas in your frame that are of similar color and tonal range even if they aren’t clouds. Like Grow, this process can be repeated as desired.
10. Refine Edges

Hope you comprehend the concept of selection tools in Adobe Photoshop. But I would really recommend you to join any Photoshop Training center in Delhi where you can attain required techniques and methods to become a Photoshop Master within a small amount of time.
And I know one place where you can go for advanced Photoshop training in Delhi and i.e. Video Editing Institute. This institute offers professional certificate and diploma courses video editing as well as photo editing. So, start learning Photoshop in a better way from today.


No comments:
Post a Comment