Saturday, December 29, 2018
Day to Night Animation in After Effects!
Checkout our latest video on YouTube to learn how to convert day into night in After Effects.
Wednesday, December 26, 2018
Important Factors to Consider Before Designing Lower Third for News Channel in Photoshop

Lower third plays a very important role in the presentations since describes major information about Topic, Place (location), Time or some extra details about the video. A well-designed lower third can grab the attention of the audience to provide the details about the video. In this blog, we are going to have a look at some of the main factors that every designer should consider before designing any kind of lower third in Adobe Photoshop.
Here is an example of lower third:

Where to use Lower Thirds?
Most of the TV channels make their own stylish lower thirds to provide information such as: -
- News channels use such designs to provide breaking news, reminding upcoming shows and current time etc.
- Sports channels are used such designs
- provide the scores of the playing team and other information about the match.
- Music channel also use such designs to display the lyrics of the music.
There are major factors which are important to consider before designing lower thirds are:
- Video Title: It should be clear so that we can decide which type of design should be taken for the video.
- Essential Details Regarding the Video: Another step is to provide accurate information with the combination of correct typography, images, logo, shapes and graphics etc. You also can choose different font, icons, size, position to make a lower third attractive and eye catchy.
For a design Typography plays a key role since it can strongly influence the people’s reaction on the design. By designing lower third, one should be very careful in the selection of the typeface as it just as essential as the use of graphics, color in creating the design.
Logo and Shapes
Another important thing is the selection of correct shapes and placing the shapes and logo at the right place in the lower third.
Color
The color scheme is indeed an indispensable part of any design be it a lower third or any other layout. One should be very calculative while picking out the color schemes.
Size and Position
We can select the accurate size and position according to the contents of the video. And make sure that the size of the lower third should be me normal; not too big or small. The position also matter according to the video. We can place it anywhere as per the design of the overall video but generally prefer that lower third should be in lower left bottom of the video.
So, conclusively, we have discussed on some factors that you really need to consider while designing lower thirds.
Let’s sum-up all the above-mentioned points.
- Firstly, we analyse the content as per the video type.
- Then start working on design by choosing correct typography, colour scheme, shape, size and position of the lower third according to the type of news in the news channel.
Hi, I’m Rahul Bansal pursuing Post Production Master Course from Video Editing Institute. This blog is the part of my Photoshop assessment which topic is on “Green Tea”.
Hope it will help you.
Tuesday, December 18, 2018
How is QuarkXPress Different from Adobe InDesign?

As We all Know Quark Xpress is a desktop publishing software for creating and editing complex page layouts and used by designers, large publishing houses and in corporate offices to produce a variety of layouts, from single page of flyers to multimedia projects that required for magazines, newspapers, catalogs etc. The old version of this application was known as ‘Page Maker’.
On the Contrary, there is InDesign software of authorized by Adobe company. It is also an in-demand desktop publishing and typesetting software application that is used to create Posters, Magazines, Flyers, Newspapers, Presentation books, and EBooks as well as publish the content for tablet devices. The best way to acquire essential skills is by signing-up with InDesign Course in Delhi where you will learn new features, techniques and tools of InDesign.
Today I’m going to compare the major features, advantages and disadvantages of both the applications that will give you a crystal-clear understanding.
Differences Between QuarkXPress and Adobe InDesign
Here are some differences between ‘Quark Xpress and Adobe InDesign’ discussed below:
| QuarkXPress | Adobe Indesign |
|---|---|
It supports Hex chrome color and respects the text wrap settings for objects on a master page.
| It doesn’t. |
| It is majorly used by designers and prepress professionals because its features and familiarity make it cost effective | It is the in-demand software among the graphic designers and professional visual artists. |
In QuarkXPress, the biggest supporting document is 48 inches.
|
In InDesign, the biggest document page size is 216 inches.
|
It supports multi-page spreads and fit them in the maximum page width.
| It supports maximum 10 pages of spreads, independently of the page size. |
| It supports the import of PDF 1.3 and PDF/X files. | It imports PDF files version 1.3, 1.4 and 1.5 as well as PDF/X 1a and PDF/X3. |
It only supports PDF 1.3.
|
It supports the export of PDF files version 1.3, 1.4 and 1.5, PDF/X 1a, PDF/X3 and can generate PDF layers in PDF 1.5 files.
|
Quark gives the software license to the end user and allowed to activate the software only on 1 or 2 computers.
| InDesign provides software license for use on one computer and up to the permitted number of computers. |
| Installation of Quark software on a local area or wide area network is prohibited. | Its installation on a local area internal network is authorized. |
Concurrent Installation of this application on several computers is prohibited, even if the software used only one computer at a time,
|
The concurrent installation of the software on a desktop and a portable computer or laptop owned by the same user is authorized.
|
It is used by a limited number of people because it has a poor interface as well as requires brain activity.
| It is used by a large number of people because it is very clear and requires very less brain activity. |
| Costly than InDesign. | Low-priced than QuarkXPress. |
Known as software used for pagination and does not provide any designing feature to the user.
|
It is also used and famous for pagination as well as offers some features for designing.
|
QuarkXPress doesn’t provide password protection option in the PDF files.
| Contrary, In Indesign a user can apply a protection password to PDF files. |
| It doesn’t have any layer’s palette. | It has a layer’s palette |
It offers long several page layout options to the user.
|
It doesn’t offer such options.
|
Quark provides more intuitive color management dialog box.
| Indesign has few new color management tools. |
| It can handle TIFF, JPEG, EPS, and other file formats too. | Apart from the TIFF, JPEG, EPS and other file formats, Indesign also supports Illustrator and Photoshop files. |
This application can manage only one language at one time.
|
It provides its users a dictionary of 12 languages so, the user can open a Japanese document in the English version.
|
Quark looks only at one line of text at one time.
|
Its paragraph composer feature adjusts the hyphenation and spacing between the letters and the characters in the whole paragraph.
|
Conclusion
By making differences between Adobe Indesign and QuarkXPress I get to know about the features/advantages/uses of both software separately as well as the import and export capacity of both. These both software fulfills the flaws of each other and makes work easy for the user.
Either you go for InDesign or QuarkXPress training course, both courses will provide you with essential skills which will play a vital role for a bright career. These applications basically are known for pagination that includes page layout, master page or anything related with a page of the document. Quark and Indesign are similar but still different in functioning and features.
Author Introduction: The author of this blog is Anjali Garg who is pursuing Graphic Master course from ADMEC which is a leading graphic design institute in Delhi. This blog includes the top features, advantages and disadvantages of both the desktop publishing applications.
To be the master of both the interpretative applications signing-up with a renowned graphic design institute like ADMEC Multimedia Institute is highly advisable since an ideal institute is efficient to make you a skilled and creative designer. Don’t wait, go ahead and join the world of creativity altogether.
Wednesday, December 12, 2018
Top 10 Tools in CorelDRAW Every Graphic Designer Should Know

Do you have the flair to be a graphic designer but don’t have any idea where to start from? Don’t be sad since for getting command on graphic designing, learning CorelDraw is beneficial for you. But to learn this desktop publishing application you need to emphasis on its core tools as they can play a primary role in making things easy for you. So, let’s get started from the impression of a vector drawing program.
An overview of CorelDRAW
CorelDRAW is a vector graphics editing software. It teaches us how designs are made in multiple stages and help graphic designers by making their work easy. It is basically a packaging software used for designing logos, letterheads, packaging, visiting cards, etc. The first version of CorelDRAW was developed in January 1989 and the latest version till date is 2018(x8). The right way to learn this application is by joining a CorelDRAW training course from any renowned training institute in Delhi where you can comprehend core concepts and techniques from the industry experts.Top 10 tools in CorelDRAW
Below is the list of top 10 effective and essential tools of CorelDraw which can help you to learn graphic designing more effectively.
At no. 10 Drop Shadow Tool: This tool helps us to create a shadow behind or below the objects/texts which further adds the details to design and enhances its look.

At no. 9 Fountain Fill Tool: This is a color fill tool which helps to fill an object with a gradient of colors or shades. It gives the object an attractive look.

At no. 8 Color Eyedropper Tool: This is also a color fill tool but this tool helps to sample colors from other objects and apply it to another object. Probably this is the best tool for filling colors in logos after tracing them.

At no. 7 Transparency Tool: This tool is for partially revealing image areas underneath an object. If you want o merges different images then using this feature is really helpful for you. Trans-parenting images can add more no. Of images and creating a college, further enhancing the design.

At no. 6 Pen Tool: Using this tool we can draw curves in segments and preview each segment as we draw. This tool is very handy when we want to trace objects. According to me this is the best tool for tracing objects and duplicating them.

At no. 5 Rectangle Tool or Basic Shapes Tool: These tools help us create objects of different shapes like rectangle, square, triangle, cylinder, heart, etc. This tool is very useful for creating objects with complete accuracy.

At no. 4 Freehand Tool: This tool helps in drawing curves and straight-line segments. Using this tool, we can create objects of our own shapes.

At no. 3 Shape Tool: This tool is mainly used for editing purposes such as manipulating text characters and curve objects. This tool is very useful for tracking objects as it helps to edit the curves and further adding accuracy.

At no. 2 Text Tool: One can easily recognize the work of this tool by its name. It helps to add and edit paragraph and artistic text. This is the only tool to add text and is very important for creating designs.

At no. 1 Pick Tool: This tool is the most important tool as it selects, positions, or transforms objects. This tool helps to move and place objects according to our will.

At no. 6 Pen Tool: Using this tool we can draw curves in segments and preview each segment as we draw. This tool is very handy when we want to trace objects. According to me this is the best tool for tracing objects and duplicating them.
At no. 5 Rectangle Tool or Basic Shapes Tool: These tools help us create objects of different shapes like rectangle, square, triangle, cylinder, heart, etc. This tool is very useful for creating objects with complete accuracy.
At no. 4 Freehand Tool: This tool helps in drawing curves and straight-line segments. Using this tool, we can create objects of our own shapes.
At no. 3 Shape Tool: This tool is mainly used for editing purposes such as manipulating text characters and curve objects. This tool is very useful for tracking objects as it helps to edit the curves and further adding accuracy.
At no. 2 Text Tool: One can easily recognize the work of this tool by its name. It helps to add and edit paragraph and artistic text. This is the only tool to add text and is very important for creating designs.
At no. 1 Pick Tool: This tool is the most important tool as it selects, positions, or transforms objects. This tool helps to move and place objects according to our will.
So, these were the top 10 tools used in CorelDRAW according to me.
Hi, my name is Naman Luthra and my program is Graphic Design Premium course, which I’m pursuing from ADMEC Multimedia Institute. My course comprises 4 major designing software which are Adobe Photoshop, Adobe Illustrator, Adobe InDesign and CorelDRAW. This blog is one of my CorelDraw project’s parts. Hope it will assist you!!
Monday, December 10, 2018
How to Plan Area in AUTOCAD?

This blog is all about AutoCAD which is one of the best drafting software in the world. I’m going to cover the process of plan creation in very simple steps. Preparing a draft of any plan is not an easy task. But when you know the simple and effective steps then this work can become a fascinating and calm work. But before we go ahead and start our discussion on plan creation, I would like to throw some light on an overview of this amazing drafting application. So, Let’s get started.
Few Essential Points About AutoCAD:
- AutoCAD was developed by Autodesk.
- It stands for Autodesk’s computer aided design. It’s a drafting and designing software being used worldwide.
- It works on co-ordinate system.
- It is used for 2d and 3D design, mostly for civil, mechanical & architecture.
- It is very popular among small to large scale companies.
- It makes drawing and drafting very easy and handy work.
- It is cost effective and highly affordable.
- Due to its popularity there is a huge demand for skilled AutoCAD employees in the industry. But to be a professional you need to get trained by joining professional AutoCAD course in Delhi from any renowned training institute.
What is a Floor Plan?

Here is your answer:
- It is a diagram of a building with a top view
- It consists of measurements, furniture, appliances, or anything else which is essential in the plan.
- Floor plans help in designing furniture layout, electrical installation, and planning of an area.
- It also consists of other architectural features like fireplaces, shelves, and benches.
- Placement of staircases.
- It has walls, windows, and doors.
Importance of Floor Plan Design
The floor plan is used to communicate your idea in the form of a layout. A good floor plan is a plan that gives a proper flow between spaces to make the movement of a person easy and comfortable.
Key Characteristics of a Good Floor Plan When Designing Any House
- Versatile and flexible: Always make sure in future an office can easily be turned into a child's bedroom whether for your family or a future buyer’s. A room can be used in various ways in future.
- Size matters: Always think about the number of people using that space at one time, whenever designing any room or hallway.
- Have efficient circulation and storage.
- Have natural lighting and good ventilation system according to the sun and wind orientation.
- Having windows in the plan help in balancing daylight and making room spacious.
- Maximum use of available spaces is highly recommended.
- Good and easy circulation of the spaces designed for the client.
How to Draw a Floor Plan?
- Choose an area: Specify the area to be drawn. Prepare a design based on the size and shape of the location on which to build.
- Measurements: Do proper dimensioning and measurement of the walls, doors, furniture so that the floor plan will be accurate.
- Walls: Draw separate walls for each room of the building.
- Architectural features: Add architectural features like doors, windows, ventilation and other important things like refrigerator, washing machine, dishwasher, WC, wash basin etc.
- Furniture: Furniture can also be added as per the demand of plan.

How to Plan Area in AutoCAD?
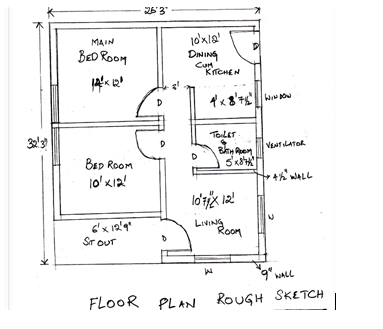
Any drawing is an accumulation of ideas put into written form when we receive them from the customer. Questions come to us in many shapes, like what is the number of rooms in the house? How many people will utilize the dwelling or what is the workflow that will exist in the structure?
- First, we prepare a rough sketch according to the need of the client.
- Creating a Drawing Using the AutoCAD then, we select our architectural template, Units, Dimension Style, Line scale and other specific variables.
- After that we create different layers for walls windows, doors and others that are required.

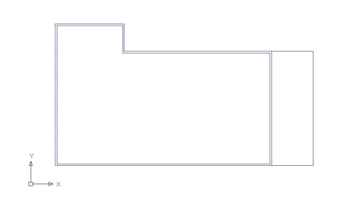
Almost all drawings need to begin with the same approach, so in the floor plan, the perimeter of the proposed house is made first.
Draw Interior Walls
1. With the offset command draw internal walls.
2. Mention offset distance.
3. Now, you need to select an internal line of the recently drawn wall then click to offset the line option by moving towards the center of the plan.
4. Replicate the offset command once again.
5. Repeat the above steps to mark the offset of the internal wall
6. Now, join the new lines together, you can take help from the below-given image.
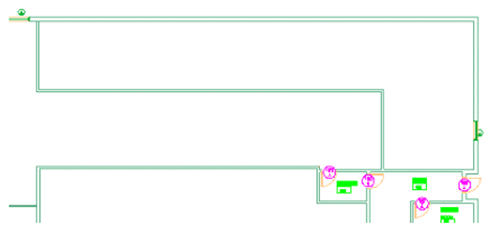
7. With the help of the Trim tool. Trim the extended or excess lines at the intersection of walls to get finished wall placement.

Placement of Doors and Windows
1. Draw using line and arc command according to the width of the door.

2. Repeat the above commands to draw doors with required width.
3. With the help of Trim tool clean up the extra line of doors that are intersecting the walls.

4. With the help of offset tool make Windows by offsetting the walls to the required window width.
5. Trim the extra extended window lines.
6. At the end, add door and room tags with the help of text command.
So, finally, we have designed a plan in AutoCAD. Wasn’t difficult? Well I don’t think so and I’m sure you too. Now it’s your turn to design a home plan or any other type of plan in this drafting application. I hope you won’t find any trouble while creating, and don’t worry if you’ll find any issue. Just read this blog once again or leave your issue in below given comment area.
Author Introduction: This blog is written by Priya Bhatnagar pursuing ArchitectInterior Premium course from ADMEC which is an education partner of CAD Training Institute
Thursday, December 6, 2018
How to Select the Best Web Design and Development Institutes in Delhi?

There are
many institutes who call themselves a best web
design and development institutes in Rohini and I agree that few of them
are seriously trying to be the best, and some are just replicating, and only
few are truly best for web design and
development training in Rohini.
When it
comes to choose right training center then lots of confusion creates in the
mind. There are many web design
institutes in Rohini to choose from. But few of them are pretty good but
how can you know?
Points to Keep in Mind while Selecting a Web Design and
Development Institute
#1 First Go for
Industry Demand
You can
easily spot which course content is necessary according to the demand of the
current industry. I am giving you a way and surely that will help you in
knowing what industry expects from a web designer and developer when you will
go for the interview. You just need to search some recruitment and jobs
websites such as timesjobs, naukri, placementindia etc and definitely you will
have a perfect idea about that.
#2 Look for
Courses Offered by Institute
Before
selecting any institution for you career you need to read all the courses
offered by the center for web design and web development. This will help you to
better understand a particular training center. Most of the training centers
have unique courses and content while some of them not. You need to check how
many courses they are offering as career courses and how many specialization
courses if any of the institute is expert in any of the subject then surely it
will offer specialization short term webdesign and development courses too.
#3 Most Essential
- Experienced Faculty
Experience
of faculty is also a key factor for you if you want to become a successful web
professional after the training in any of the center. There are 3 types of
experienced mentors you meet in an institute for web design and UI Designing training;
you need to be clear about it before joining any institution. One is who have
experience of teaching only and other one is who have experience of industry
only and last one is one who has experience of teaching plus industry. So
always keep your choice with the last one as he can only share real world
skills with good teaching.
#4 Basic to High
Level Customization Training
Another key
point you should analyze before starting your course is whether or not the web design and development institute
offering you 100% professional training on customized web pages or not. Lots of
training centers provide basic template web design knowledge. Now a day's
anybody can create a basic HTML web page and change its content to use for own
business or can sell to the clients. But you must ask yourself before selecting
the training center for you career: "is this really what you are looking
for?"
#5 Have a
discussion with the Faculty
It will be
always better for you a face-to-face discussion with faculty so that you can
make a judgment after putting up some technical queries directly to the faculty
and you can also discuss about the contents with him that he or she will teach
you during training. This gives you a chance to understand your prospective
faculty too. You should have a good idea about your web design and development course before starting your
search for the institution; you can search on Google and other search engines
to know more about your course else you can go with your friend or relatives if
you know anyone that have good knowledge of it.
#6 Look for Institute
Infrastructure Too
Is that
institute having a good infrastructure? You must know that before the joining
the institutions. Make sure the web
design and development institutes you have chosen has good assessment,
evaluation, infrastructure, computer labs, library and conducts special
sessions on various related topics with a number of quizzes and events to groom
its students. Never forget to take the certificate or diploma after completion
of training.
So, this is
how we have reached towards the end of this blog. I mentioned the top 6 points
that are highly suggested to keep in concentration while searching for a
training center. These opinions will certainly be your support and help you to
pick up your vision platform like WebDevelopment Institute.
Sunday, December 2, 2018
A Quick Introduction to the Workspace of CorelDraw

If you are just started learning CorelDraw then you have landed on the right page. Today in this blog I’m going to give you a quick introduction to the workshop of this graphic design application. It will definitely assist you to comprehend your software more deeply and firmly.
So, let’s get started!!
Friday, November 23, 2018
How to Create Motion Graphics in Adobe After Effects?

Animation is a field in which images and objects are put into movement i.e it is a dynamic area in which images or objects are manipulated such that they appear as moving images. I am Alisha Garg pursuing Graphic Master Plus course from Admec Multimedia Institute. Today I’m going to discuss about animation, motion graphics and how we can create a basic motion graphic using Adobe After Effects. Before starting we should be clear with the term motion graphics and After effect software.
Wednesday, November 21, 2018
Points to Remember while Working with HTML

One of HTML's main job is to give appropriate structure and appearence to the document so that the browser can understand it correctly. As you are well familiar with this markup language but there are some important things which can create some issues in your design. To fetch these issues you have to consider some semantics in mind that are quite necessary.
Tuesday, November 20, 2018
How to Create a walk through in Max?

Autodesk 3ds Max is a well-known and leading 3d software that generates professional 3D modelling and rendering projects and has plentiful functionalities for providing quick animation and graphic rendition. It was initially known as 3d Studio in the year of 1988. Now we all know it as Autodesk 3ds Max since it was developed by Autodesk in 2009. Gradually it has become an indispensable tool that one need to comprehend for the enhancement of their career. For be a master of this application joining an advanced 3ds Max course in Delhi is highly recommended by experts.
Saturday, November 10, 2018
10 Best Features of Adobe InDesign Every Graphic Designer Should Know

Adobe InDesign is unique in many respects in comparison to many other digital publishing applications as it as varied features which makes it convenient for the designers to get good at their task. It is one of the latest desktop publishing design software from Adobe, and it offers many new features, including components from other Adobe favorites, like PageMaker, Photoshop, and Illustrator. It is not only convenient, but allows control over page elements and overall design. By learning this software one can boost their career the print media industry. But to get sound knowledge you really need to join InDesign Course in Delhi from a renowned training institute.
Friday, November 9, 2018
Role of Photoshop in 3D Animation

Adobe Photoshop a versatile designing software has its own significance in the arena of 3d Animation. Today we are going to know how Photoshop plays a dispensable role in the field of 3d Animation. One who is learning animation should also go for advanced Photoshop courses in Rohini to attain sound command on this amazing application.
Thursday, November 1, 2018
Types of Light in Cinema 4d That You Might Not Know

Are you looking for becoming an expert animator, 3d modeler and motion graphics artist? If yes then you should go for Cinema 4d which is an easy and innovative tool that can elevate you designing to the next level. Lighting is an indispensable when you work with modeling, animation and motion graphics in Cinema 4D and this is what we are going to discuss today in this blog post.
Wednesday, October 31, 2018
Is Learning Revit Architecture Important for Becoming an Expert Architect?

If you are thinking to learn Revit Architecture then before going to start you should know the top benefits of its training. Why you should go for Revit? Here in this blog post we are going to cover this question and that will help you to learn Revit course in Delhi from any institute.
Thursday, October 25, 2018
Types of Lights in 3ds Max

Lights play a significant role in 3ds Max as through perfect lighting one can generate stunning scenes and projects. So, here in this blog, we are going to cover the essential lights that will help you to comprehend this 3d modeling software more deeply while your 3ds Max course training.
Let’s get started with an overview of Max.
An Overview to 3ds Max
3DS MAX is a professional computer graphics program for making 3d drawings, animation, graphics, games and many more. This program is produced by Autodesk, it has modeling capability for architecture, it is also used gaming developers, tv studios etc. The most common versions used by many 3ds max users is 3ds max 2014 and 2015. It supports both the import and linking of AutoCAD, Revit drawings. The main plugins used by this application is v-ray which is one of the main parts to make a faultless drawing.
Use of 3ds Max
It is mainly used of architecture and construction for 3d & 2d rendering and animation program.
For becoming a master of this application, you need proper guidance and for this joining an ideal institute like ADMEC Multimedia Institute is highly recommended.
Types of Lights in 3ds Max
There are mainly three types of lights in 3ds Max which are given below.
- Standard light
- Photometric light
- V-ray light
Let’s have a look at each type one by one.
STANDARD LIGHT
Standard light is divided into 6 parts which are
- Target spot
- Free spot
- Omni light
- Sky light
- Mr area omni
- Mr area spot
Below I’m going to explain all the 6 parts of Standard Light.
- Target spot light: This light is like a flash light, it uses a movable target object to move a light.
- Free spotlight: This light has no target object this light can be moved and can also be rotated to any direction of your choice.
- Omni light: It rays lights in all direction within a single source this light is useful for filling the light at any point source, this is omni light.
- Sky light: This light is a day light that add the sunlight rays in the sky light you can see the sky and sun rays. This light is mainly used in window for passing the rays of the sun and also used in exterior.
- Mr area omni: It is a light that form the light in cylindrical or spherical shape, it is used in standard light.
- Mr area spot- Used to form a rectangular shaped light.
PHOTOMETRIC LIGHT
It is one of the important lights in 3ds Max which enable the architects to provide real world lighting effect in the drawing. There is a type of Photometric light which is given below.
Target Light- The light that aimits object to target the light when you add a target light automatically adds to assign its controller.
V-RAY LIGHT
For starting the work with v-ray first, you should know to work with modeling in 3ds max. It is an extension for 3ds max but it is not a replacement for 3ds max software as V-ray is a plugin that is used for realistic render images.
There is a feature called anti-aliasing in 3ds max which is used for image quality render and for smoothing the edges for shadows etc. Main of the important part in 3ds max is to control its lights. It takes huge time in render as from 5 minutes to the whole day. You can also control the quality of the image with a few settings that make the drawing perfect. There are a lot of setting in 3ds max to make the perfect render to make the look of the drawing realistic.
Author Introduction: This blog is written by Kirti Bageria who is one of the students of the Architect Interior Design Courses in ADMEC Multimedia Institute. This blog is the part of her 3ds Max Project.
Hope it will be helpful for you!!
Subscribe to:
Posts (Atom)
-
 Selection is the most important and very first thing to do in a designing application or any other field like programming. There are 10 ...
 -
 Colors is most valuable things in our life. Without colors be cannot express our ideas . In electronic things (TV and computer display) u...
 -
Computer designing software used for 2D, 3D and drafting. Developed and marketed by Autodesk. First released: - December, 1992...