Showing posts with label graphic design. Show all posts

Tuesday, September 8, 2020

Benefits of Joining Graphic Designing Courses from ADMEC Multimedia Institute in Delhi

If you are looking for a prosperous career in the field of graphic designing then you must join a training institute where you can get the best learning experience. One such place is ADMEC Multimedia Institute, located in New Delhi. It is an ideal learning destination for all the aspirants who are thinking to enter this creative design industry as a graphic designer. 

Right here, in this blog we are going to explore some of the benefits that you can attain by joining ADMEC’s graphic design courses.


1. A Wide Range of Career Courses

Our institute has both certificate and diploma courses in graphic designing that can be pursued in both online and classroom training. All the programs, especially diploma can be completed on fast track and weekend training modes along with regular.

Check out the complete list of graphic designing courses to know in detail.


2. Systemic Course Curriculum as per Industry Standard

All the programs offered by ADMEC are designed as per the industry standard. They are covering the basic to advanced concepts, especially in diploma programs which are career-oriented solution for the aspirants, looking for a prosperous future in designing. Curriculum of the courses is divided into modules and semesters. From industry basics to software core command, you’ll go through everything.


3. Fine Arts and Visual Grammar Classes

Apart from software classes, our institute is also offering fine arts and visual grammar so that students can think out of the box to design something amazing. We believe in providing in-depth knowledge and essential skills to our students so that they can visualize their own ideas on the digital canvas of the advanced software. That is only possible with these fine arts and visual grammar classes.


4. Special Workshops

To cover up the visual grammar in detail, we conduct special workshop twice in a month. These workshops are conducted by guest faculty members. 


5. 100% Practical Training

Classes conducted by our trainers are 100% practical. They are not going to tell how you can create a logo for example but they are actually going to show you the steps that are required to create a logo. So, everything that you are going to learn would be practical.


6. Industry Visits

We believe that our students must know about the ongoing trends of the industry that is why we take them out for exhibitions, galleries, print packs, etc. This is all making them aware with the level of the industry and encourages working hard and learning more.


7. Design competitions

Our design events and competitions are like the doze of refreshments for the students since they get a stage to show their hidden talents by presenting their team leading skills and collaborations. You can read more about our events to know in detail.

There are many more such reasons to add yet in the list.

In order to know more about our institute, you can visit ADMEC Multimedia Institute.

Sunday, May 24, 2020

Tips for Institutes and Colleges for Providing Training Efficiently

The biggest challenge for the teacher from any training institute is to give attention to each student and convey their message or ideas very effectively for creating a lasting impression.

Here are some more tips for the training institutes for providing efficient education to the students.

  •  Always interact with students in a positive manner, because positive attitude is also key point for creating learning effective.
  • Opt technology and innovative way of teaching. This way helps students to engage with different kinds of stimuli and it also creates environment of activity based learning. This method makes your classroom training more interesting.
  • Take feedback from students once in a week so that trainers also get to know what was good and what was not. It is very essential if you really want to improve your skills.
  • Conduct process of continuous evaluation. If you want to develop your skills as a successful trainer so run a strong evaluation process.
  • Some topics can be taught best when they are taught outside of the classroom. For this conduct some outdoor sessions which are relevant to topic then students will find fresh and exciting.
  • Involve trainees. Ask them to share their experiences related to training. So that students could know about their experiences. Hearing different voices also keeps sessions interesting and valuable.
  • Never stop learning. Put your phone on silent and curl up on with some books on design and keep experimenting.
  • Provide some Games-Based classes too. Games are also used for educational purposes so prepare some games related to designing topics this is also effective way of learning.

Keep these key points in mind as these are some tips which should be followed by all the design institutes and colleges for making design training productive.

ADMEC Multimedia is one of the top designing institutes in Delhi which continuously follow these tricks and providing training to its students in various graphic design courses.

Saturday, April 6, 2019

Join Best Adobe Illustrator Training Institute in Delhi to Become the Graphic Design Pro

When we talk about graphic design, it’s not just a simple field of designing where we design something that can be further get printed but it is a complex art that uses visual compositions as well as communication to communicate the design ideas, illustration, typography, photography, etc. 

Hence, we can say that graphic design is all around us and gives us a chance to analyze and comprehend the design principles, technologies related to print media, and other design elements.

When we look at the career options and scope in graphic design; experts have clearly projected its growth to increase up to 4% in the coming years. 

It is an in-demand career field having numerous golden opportunities for the aspirants like you but it also requires a specific set of skills and design techniques.

So, in order to become a Graphic Designing Pro, you must have to first become a master of many different skills and tools. 

One such essential design tool is ADOBE ILLUSTRATOR.

A Quick Overview to Adobe Illustrator

Designing is a very complex art and learning through digital is rather more complex. You need to master different skills and tools to become a graphic designer. 

And yes, you can go for Adobe Illustrator. It is a vector graphics editor tool widely used for creating stunning illustrations, layouting, composting, logos, etc. 

Benefits of learning Adobe Illustrator for a Graphic Designer

Adobe Illustrator is one of the most popular designing tools used by professional artists for generating classic outputs. Some of its benefits are given below.

  • It can run on both Windows and MAC OS.
  • There is no need for any specialization for learning Illustrator.
  • Its trial version is available
  • It will help you to expertise the design arena
  • Using Illustrator, you can create amazing vector graphics such as logo, sketches, vector art, icons, poster, stationery, campaigns, brochure, etc.


And many more…

Why Join ADMEC For Adobe Illustrator Training?

For learning Illustrator joining an ideal design training like ADMEC Multimedia Institute is highly recommended. Below are some of the important reasons to join us.

Latest Course Curriculum 
We always update our curriculum according to creative industry professionals.
You can learn the latest version of Adobe Illustrator.
You can learn the software from basic to advanced level.

Experienced Mentor’s
Learn from well trained and experienced teachers.
They will train and guide you in your projects.
They guide and update you technically with the latest updates in the relevant industry.

Live Project Training on Illustrator
Projects are given to students within a time frame from the very beginning of the session so that they will learn to deal with the practical issues and resolve them timely.
All the projects given to students are related to practical issues one can face in the creative industry.

Institutes Infrastructure
Infrastructure in the institute is well equipped and maintained with the latest version of all the relevant software’s.
The laboratory has windows as well as Mac computers for the training.

And many more….


Adobe Illustrator Courses offered by ADMEC

Adobe Illustrator Master Course
Duration: 2 months

This Illustrator training course is a complete program for this vector graphics editor tool. This course provides an insight into the application, its common concepts, and features that every designer should know. 

Know more about our Illustrator training course: - Illustrator Master course.
Few Learning Outcome of Illustrator Training Course from ADMEC
  • You will be able to go for visual communication through your designing.
  • You will know how to create stunning designs for branding.


There are many more such points which are being included in this list but to read everything in details you can explore our course content given on our site.

So, to build your personality as a professional graphic artist and designer join ADMEC professional GRAPHIC DESIGN COURSES which will furnish the significant skills to make a mark on the design industry. 

Tuesday, December 18, 2018

How is QuarkXPress Different from Adobe InDesign?


As We all Know Quark Xpress is a desktop publishing software for creating and editing complex page layouts and used by designers, large publishing houses and in corporate offices to produce a variety of layouts, from single page of flyers to multimedia projects that required for magazines, newspapers, catalogs etc. The old version of this application was known as ‘Page Maker’.

On the Contrary, there is InDesign software of authorized by Adobe company. It is also an in-demand desktop publishing and typesetting software application that is used to create Posters, Magazines, Flyers, Newspapers, Presentation books, and EBooks as well as publish the content for tablet devices. The best way to acquire essential skills is by signing-up with InDesign Course in Delhi where you will learn new features, techniques and tools of InDesign.

Today I’m going to compare the major features, advantages and disadvantages of both the applications that will give you a crystal-clear understanding.

Differences Between QuarkXPress and Adobe InDesign


Here are some differences between ‘Quark Xpress and Adobe InDesign’ discussed below:


QuarkXPress  Adobe Indesign
It supports Hex chrome color and respects the text wrap settings for objects on a master page.
It doesn’t.
It is majorly used by designers and prepress professionals because its features and familiarity make it cost effectiveIt is the in-demand software among the graphic designers and professional visual artists.
In QuarkXPress, the biggest supporting document is 48 inches.
In InDesign, the biggest document page size is 216 inches.
It supports multi-page spreads and fit them in the maximum page width.
It supports maximum 10 pages of spreads, independently of the page size.
It supports the import of PDF 1.3 and PDF/X files.It imports PDF files version 1.3, 1.4 and 1.5 as well as PDF/X 1a and PDF/X3.
It only supports PDF 1.3. 
It supports the export of PDF files version 1.3, 1.4 and 1.5, PDF/X 1a, PDF/X3 and can generate PDF layers in PDF 1.5 files.
Quark gives the software license to the end user and allowed to activate the software only on 1 or 2 computers.
InDesign provides software license for use on one computer and up to the permitted number of computers.
Installation of Quark software on a local area or wide area network is prohibited.Its installation on a local area internal network is authorized.
Concurrent Installation of this application on several computers is prohibited, even if the software used only one computer at a time,
The concurrent installation of the software on a desktop and a portable computer or laptop owned by the same user is authorized.
It is used by a limited number of people because it has a poor interface as well as requires brain activity.
It is used by a large number of people because it is very clear and requires very less brain activity.
Costly than InDesign.Low-priced than QuarkXPress.
Known as software used for pagination and does not provide any designing feature to the user. 
It is also used and famous for pagination as well as offers some features for designing.
QuarkXPress doesn’t provide password protection option in the PDF files. 
Contrary, In Indesign a user can apply a protection password to PDF files.
It doesn’t have any layer’s palette.It has a layer’s palette
It offers long several page layout options to the user.
It doesn’t offer such options.
Quark provides more intuitive color management dialog box.
Indesign has few new color management tools.
It can handle TIFF, JPEG, EPS, and other file formats too.Apart from the TIFF, JPEG, EPS and other file formats, Indesign also supports Illustrator and Photoshop files.
This application can manage only one language at one time.
It provides its users a dictionary of 12 languages so, the user can open a Japanese document in the English version.
Quark looks only at one line of text at one time.
Its paragraph composer feature adjusts the hyphenation and spacing between the letters and the characters in the whole paragraph.

Conclusion

By making differences between Adobe Indesign and QuarkXPress I get to know about the features/advantages/uses of both software separately as well as the import and export capacity of both. These both software fulfills the flaws of each other and makes work easy for the user.

Either you go for InDesign or QuarkXPress training course, both courses will provide you with essential skills which will play a vital role for a bright career. These applications basically are known for pagination that includes page layout, master page or anything related with a page of the document. Quark and Indesign are similar but still different in functioning and features.

Author Introduction: The author of this blog is Anjali Garg who is pursuing Graphic Master course from ADMEC which is a leading graphic design institute in Delhi. This blog includes the top features, advantages and disadvantages of both the desktop publishing applications.

To be the master of both the interpretative applications signing-up with a renowned graphic design institute like ADMEC Multimedia Institute is highly advisable since an ideal institute is efficient to make you a skilled and creative designer. Don’t wait, go ahead and join the world of creativity altogether.

Wednesday, December 12, 2018

Top 10 Tools in CorelDRAW Every Graphic Designer Should Know


Do you have the flair to be a graphic designer but don’t have any idea where to start from? Don’t be sad since for getting command on graphic designing, learning CorelDraw is beneficial for you. But to learn this desktop publishing application you need to emphasis on its core tools as they can play a primary role in making things easy for you. So, let’s get started from the impression of a vector drawing program.


An overview of CorelDRAW 

CorelDRAW is a vector graphics editing software. It teaches us how designs are made in multiple stages and help graphic designers by making their work easy. It is basically a packaging software used for designing logos, letterheads, packaging, visiting cards, etc. The first version of CorelDRAW was developed in January 1989 and the latest version till date is 2018(x8). The right way to learn this application is by joining a CorelDRAW training course from any renowned training institute in Delhi where you can comprehend core concepts and techniques from the industry experts.

Top 10 tools in CorelDRAW

Below is the list of top 10 effective and essential tools of CorelDraw which can help you to learn graphic designing more effectively.

At no. 10 Drop Shadow Tool: This tool helps us to create a shadow behind or below the objects/texts which further adds the details to design and enhances its look.


At no. 9 Fountain Fill Tool: This is a color fill tool which helps to fill an object with a gradient of colors or shades. It gives the object an attractive look. 


At no. 8 Color Eyedropper Tool: This is also a color fill tool but this tool helps to sample colors from other objects and apply it to another object. Probably this is the best tool for filling colors in logos after tracing them.


At no. 7 Transparency Tool: This tool is for partially revealing image areas underneath an object. If you want o merges different images then using this feature is really helpful for you. Trans-parenting images can add more no. Of images and creating a college, further enhancing the design.


At no. 6 Pen Tool: Using this tool we can draw curves in segments and preview each segment as we draw. This tool is very handy when we want to trace objects. According to me this is the best tool for tracing objects and duplicating them.


At no. 5 Rectangle Tool or Basic Shapes Tool: These tools help us create objects of different shapes like rectangle, square, triangle, cylinder, heart, etc. This tool is very useful for creating objects with complete accuracy.


At no. 4 Freehand Tool: This tool helps in drawing curves and straight-line segments. Using this tool, we can create objects of our own shapes. 


At no. 3 Shape Tool: This tool is mainly used for editing purposes such as manipulating text characters and curve objects. This tool is very useful for tracking objects as it helps to edit the curves and further adding accuracy.


At no. 2 Text Tool: One can easily recognize the work of this tool by its name. It helps to add and edit paragraph and artistic text. This is the only tool to add text and is very important for creating designs.


At no. 1 Pick Tool: This tool is the most important tool as it selects, positions, or transforms objects. This tool helps to move and place objects according to our will.


So, these were the top 10 tools used in CorelDRAW according to me. 

Hi, my name is Naman Luthra and my program is Graphic Design Premium course, which I’m pursuing from ADMEC Multimedia InstituteMy course comprises 4 major designing software which are Adobe Photoshop, Adobe Illustrator, Adobe InDesign and CorelDRAW. This blog is one of my CorelDraw project’s parts. Hope it will assist you!!

Sunday, December 2, 2018

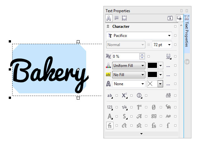
A Quick Introduction to the Workspace of CorelDraw


If you are just started learning CorelDraw then you have landed on the right page. Today in this blog I’m going to give you a quick introduction to the workshop of this graphic design application. It will definitely assist you to comprehend your software more deeply and firmly.

So, let’s get started!!

Saturday, November 10, 2018

10 Best Features of Adobe InDesign Every Graphic Designer Should Know


Adobe InDesign is unique in many respects in comparison to many other digital publishing applications as it as varied features which makes it convenient for the designers to get good at their task. It is one of the latest desktop publishing design software from Adobe, and it offers many new features, including components from other Adobe favorites, like PageMaker, Photoshop, and Illustrator. It is not only convenient, but allows control over page elements and overall design. By learning this software one can boost their career the print media industry. But to get sound knowledge you really need to join InDesign Course in Delhi from a renowned training institute.

Sunday, October 14, 2018

How to Create and Use Table in InDesign?


This blog is all about InDesign and covers the steps of creating table in it. Apart from the creation it will focus on the use of table that is an essential aspect to comprehend while learning InDesign course in Delhi from a training institute. So, lets start from an insight to Adobe InDesign.


Introduction About Adobe InDesign

InDesign Software is part of Adobe software. It is used for text Editing, mount Newspaper, Magazines, Brochures, Books, and all contents that consists of many pages. In Adobe Indesign, typography, printing and proofing, interactive for PDF, Essentials, Digital Printings, Books, and advances are all same platform of work with different settings available depending on what the user is working. 

USE OF TABLE IN INDESIGN

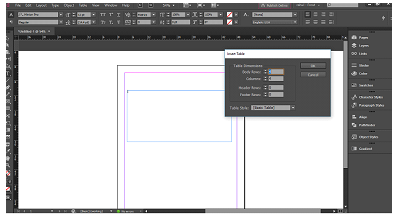
To be able to use table, first thing to know is how to create a table. To start with a table, create a new document or a layout. There are two ways for creating a table. First option is either go to table and create table or select the text tool, draw a box the size of the table needed, then to table and insert table. These two options bring two different table to the page. 

First Option:


Second Option:


Select the text tool, draw the box size of box needed for the table.
Click on the table, what can be seen is that the Option of Create Table has change to 
insert table. After inserting the table click on INSERT TABLE, and click on the text block.


After creating or inserting table, the table can be modified in many ways, such as changing the text, graphic, stroke & fills, rows & columns, and diagonal lines and the table. All these Settings can be seen in one place by going to Table, Table Option then Table Setup. 


Table is a very useful option in Adobe Indesign, as it can be also used not only for text, designing calendars, flyers, menu cards. Images can also be place by converting the cells into Graphic Box to place images that can be in books as an option of describing an image. 

One call can be graphic cell and the second one as the text cell for description. 


The Text cell can be converted by going to the menu bar, select Table, in the dropdown the option of convert call to Graphic cell is visible over there. 

After converting the cell to graphic cell, the square box changes to and can be seen a cross inside it.

To be able to insert a image in the graphic box, it is very simple, same steps, File > Place ( Ctrl+ D ) and the image is there. 

But in Graphic, first is to select the Graphic cell, then go to File > Place > select image from location, and Import. 


Conclusion: 
To conclude, table is a very useful option in Indesign as it allows the designer to create mark sheets, table of content, creating descriptions of images, arranging calendars date, keeping the same distance accordingly. Working with table is great. A non-user of Adobe Indesign can easily work with table just by importing the excel Spreadsheet into Indesign. This allow the user to make the modification in excel and just update the option in table, and the table is update, showing the modification shared.

Author Introduction: 

This is written by Gutteea Sharma who is pursuing Graphic Master Plus from ADMEC Multimedia Institute. This is blog is a part of his Adobe InDesign final project assessment. 

ADMEC Multimedia Institute is one of the prominent Adobe InDesign Training Institutes in Delhi which offers professional courses that plane as per the industry standard.

You can explore our Graphic Design Courses for more details.
Hope this blog would be helpful for you. If you have anything to share with us; you are free to leave it in the below-given comment area.

Featured Post

ADMEC Multimedia Institute Scholarship Program

The ADMEC Multimedia Institute scholarship program aims to select and trained talented non working female, married woman and non married m...